
In this tutorial, we draw an iPhone and we will start by drawing a vertical line. In this step, we draw the contours of the iPhone shape, as you see in our example. Please note that the phone has flat sides with rounded corners.
We draw the contours of the screen, and then in its upper and lower parts, we draw two horizontal lines. At the top of the screen we draw a speaker, and at the bottom, we draw a large round button, as you see in our example. Then we erase all the auxiliary lines that came in handy during the drawing process.
That’s all, you just drew a trendy iPhone, and now all you have to do is paint it, and that’s it. This article is about how to draw a phone in several steps. Written instruction will not require certain skills. It will be based on ease of execution and accessibility to the average person. With it, you can easily teach your child how to draw a phone. Before you begin, you need to prepare the necessary material.
Phone Drawing Tools
For the image of the phone, you need some kind of canvas. Take a standard piece of paper. True, the pattern will look more spectacular if you choose a medium-grained appearance instead of the usual A4 sheet. It is more pleasant to draw on it and the picture will turn out brighter. Without well-sharpened pencils also can not do. For a smooth transfer of shades in the figure, you need to take pencils with different degrees of hardness.


How to Choose a Pencil
Pencil lead is made from a mixture of clay and graphite. The degree of hardness of a pencil depends on the ratio of these minerals. A soft lead is one that contains more graphite and is darker in color. Solid stylus draws thinly, lightly, it is difficult to grind and leave furrows on paper.
Indicate the hardness and softness of the pencils in ordinary letters and numbers. Marking differs depending on the country of production.
Another obligatory subject for drawing is an eraser. A stick is also needed to grind the phone’s hatching lines (a cone twisted from a regular sheet of paper is suitable for home drawing). Such a simple device will allow rubbing sketches, creating a uniform color. And also real artists recommend not to forget to begin craftsmen about a good mood.
The image of household items is much simpler, as they are always at hand. And you can see how to draw a phone at any time. Drawing something from nature is another plus. Starting an image is worth creating simple contours. The sketch is done with thin lines. Thick lines are then more difficult to correct.
Steps for Drawing a Smartphone
When drawing a phone in stages, the first step is to draw a markup on a sheet. Such a move will ensure the placement of the figure in the center of the canvas Next, draw a rectangle and slightly round its edges. Add buttons and inscriptions to the finished base from the rectangle The smartphone is ready!
Although landline phones are not so popular today, consider the option of drawing and this mechanism on the buttons.
First, draw a rectangle. Inside this figure, we draw small ovals (they are in the future the buttons of the phone). Then draw the contour of the tube and “attach” a spiral-shaped wire to it. We round off the telephone receiver, finish it. We are finalizing the panel and small details on the device. The final step is to create shadows to give the picture a 3D effect.
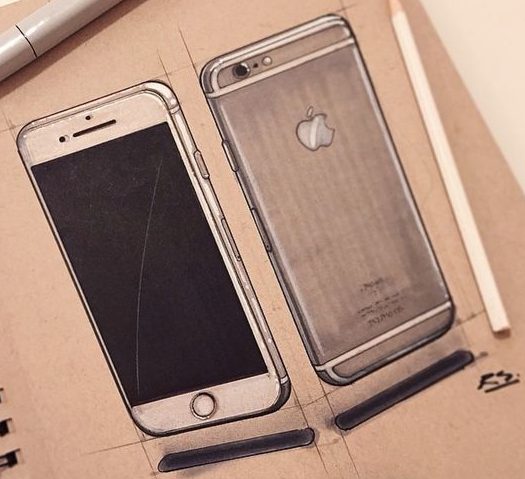
How to Draw iPhone
On a piece of paper, draw a vertical line, as if dividing it into two halves. Further along its sides we draw a rectangle and give it roundness. Then we repeat the case of the iPhone, draw the details: on the rectangle above and below we draw horizontal lines, at the bottom draw a circle (this is a button), and inside it is a small oval. In the upper part, we draw the receiver. The phone can be painted in the end, but it will look more realistic without bright colors.
ohhh yes!